
Swagger 2 Integration with Spring REST
This is the continuation of my earlier posting, Swagger For the REST of Us. Here, I will cover Springfox integration with my REST Hello World project. Though Springfox supports both 1.2 and 2.0 versions of the Swagger specification, I will stick to Swagger 2.0 specification.
Swagger generates metadata including server host name, endpoint URL, mime-types that the API can consume or produce, data types produced and consumed by operations, etc. Swagger exposes API documentation in JSON format by scanning the source code. Swagger UI is part of the Swagger project and consists of a collection of HTML, Javascript, and CSS resources. Swagger UI takes Swagger compliant JSON API documents as input and dynamically generates an interactive UI of the REST services.
I will continue with the ongoing REST Hello World example. You can find the last version of the example in REST API and Error Handling posting. The example source code mentioned in this posting can be found here.
Changes to Maven Dependencies
- Add springfox-swagger2 dependency to integrate Swagger Springfox with Spring REST service example.
- Add springfox-swagger-ui dependency to enable Swagger UI.
Configure Docket Configuration Bean
Create a new Docket bean to configure Swagger. A Docket bean is a POJO enabled by @Configuration, @EnableSwagger2,
and @Bean annotations. For Swagger 2.0, use @EnableSwagger2 annotation. Here is the example Docket bean:
Import the bean by adding the package name (if it’s missing) in the component-scan tag of the existing rest-dispatcher-servlet.xml.
Verification of Swagger
Once you have the example running, Swagger documentation in JSON format can be viewed at localhost:8080/rest-swag-simple/api-docs.

Enable Swagger UI
Other than the addition of new springfox-swagger-ui dependency in the pom.xml, changes need to be made to the
rest-dispatcher-servlet.xml to serve the static UI content of Swagger UI. Here are the changes to rest-dispatcher-servlet.xml:
Verification of Swagger UI
Once you deploy the example in Tomcat, the Swagger UI can be viewed by visiting http://localhost:8080/rest-springfox/swagger-ui.html in any browser. In my experience, the behavior of Swagger in Internet Explorer is flaky.

Once you have access to Swagger UI, you can view all the operations by clicking Show/Hide.
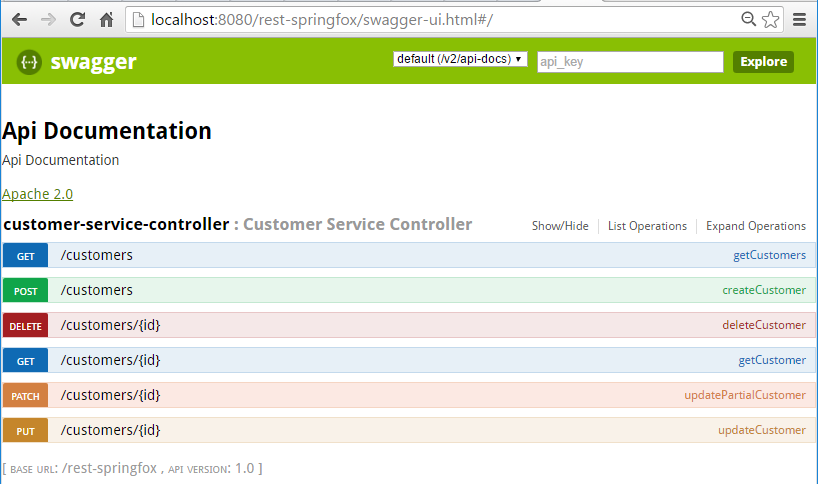
You can play around with any of the operations by clicking the operation link. Once the operation is expanded, you can retrieve data by clicking Try it out! button. In this example, try out getCustomers operation. It should fetch a list of customers.

Further Customization of Controller (Optional)
Use Swagger annotation to make the API more descriptive and hide some of the internal information, e.g., a controller’s method names, etc. Here are some of the Swagger annotations commonly used to document a controller:
@Apidescribes the general responsibility of the controller.@ApiOperation describes the responsibility of a specific method.@ApiParamdescribes a method parameter. It also describes whether a parameter is mandatory or not.
Swagger UI should look more descriptive if you now visit http://localhost:8080/rest-springfox/swagger-ui.html in your browser.
